|
What you should feel
|
Heels into wall, gluts, quads, abdominals, back muscles (but not as much as the gluts), scapular region, triceps. |
| Maintenance | 30 x 3x a week |
|
Repetition
|
Goal: 25 – 2x a day. Build up to 50 at one time. |
|
Goal
|
1. To strengthen the core and improve postural endurance.
2. To train the body how to bend at the hip, and not the spine. |
|
What to avoid
|
Solution
|
|
Hyper-extension (overarching) of the lumbar spine.
|
Squeeze the gluts and the abdominals as you push from the wall.
|
|
Looking forward: hyper-extension of the neck.
|
Keep your eyes in line with your chest.
|
|
Flexing the spine as you return to the start position.
|
Hinge at the hip.
|
|
Pain
|
Check your form or stop the exercise.
|
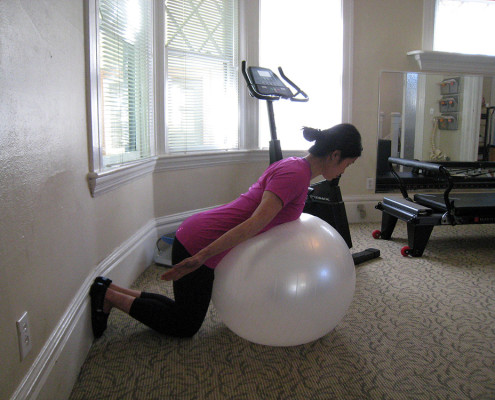
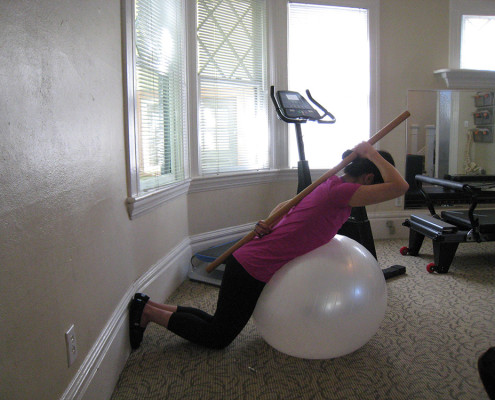
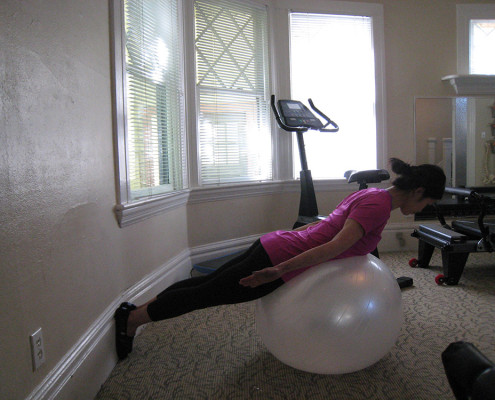
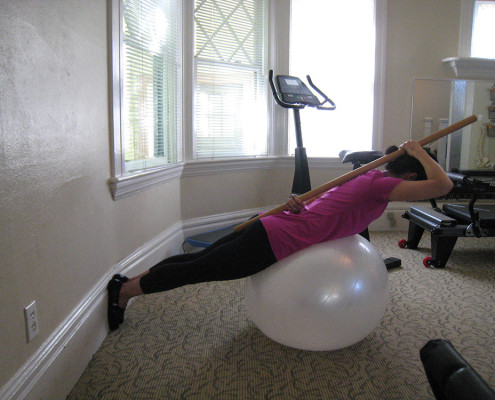
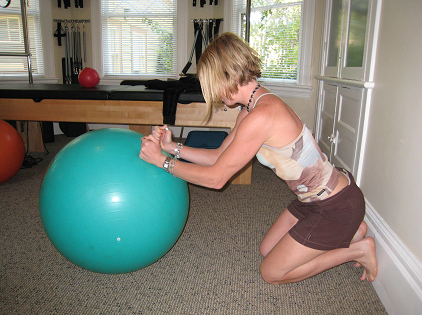
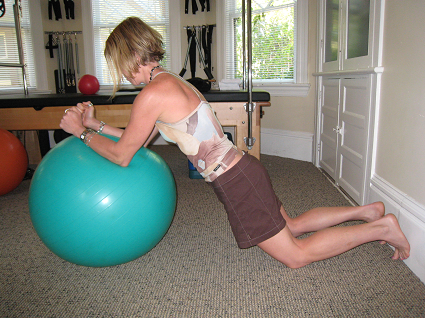
Praying Mantis
[Strength, Stability]
This is a more advanced abdominal strengthening exercise. It focuses on hinging at the hip and stabilizing the spine. This is called disassociation.
Position:
- Kneel behind the ball and sit back on your heels.
- Place your forearm on the ball.
- Lean toward the ball from your hip. Visualize a line from your ear to your hip.
- As you exhale, squeeze your abdominals and gluts to move your pelvis to the ball. Visualize a line from your ear to your knee.
- Hold five seconds.
- Inhale as you hinge at your hips to return to the start position.
|
What you should feel
|
Abdominals, arms, gluts.
|
|
Hold time
|
5 seconds.
|
|
Repetition
|
20-30 x
|
|
Goal
|
To strengthen the abdominals and stabilize the spine, while moving through the hips.
|
|
What to avoid
|
Solutions
|
|
Hyper-extension of the spine as you move toward the ball.
|
Exhale.
Squeeze the abdominals and gluts.
|
|
Rounding your spine as you return to the start position.
|
Inhale, hinge at the hips.
|
|
Pain.
|
Check your form /stop exercise.
|
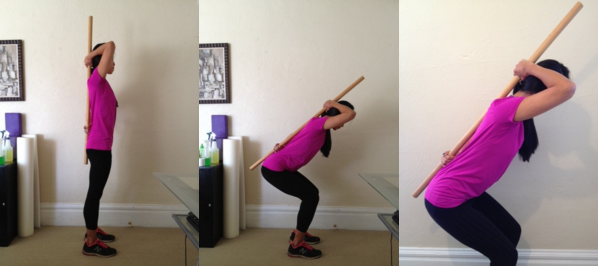
The Squat
[Strength, Stability]
Most People Don’t Know “Squat” About How To Squat!
Squatting is a basic movement, but that doesn’t mean it comes naturally to people. A squat is what we do, or should be doing, every time we get in and out of a car, pick something up, brush our teeth etc. I think that if more people knew how to squat, we would have a lot fewer cases of back pain. There are many components to a good squat, and they are all important. Here are a few tips to help you get started:
Position
- Hold a broomstick against your back, with one hand over your head, and the other hand between your lumbar spine and the stick.
- The stick should touch:
- The back of your head
- Your mid back
- Your tailbone
- There should be a small space between:
- The stick and your neck
- The stick and your low back.
- Stand with your toes just in front of a chair.
- If you can have a mirror to your side, that is helpful too.
Here are the rules:
- The contact points and spaces between your spine and the stick cannot change.
- You cannot pass your knees over your toes.
The first thing you want to think about is hinging your hips, like you’re pointing your butt back into a chair. Next, the knees begin to bend (but they shift forward very little). In order to balance, you lean your trunk slightly forward, hinging at the hips while maintaining neutral alignment. Remember, it is okay to bend over when you squat, as long as the bend is at your hips, and not through your spine.
- Notice that the angle of your trunk is about the same as the angle of your shin.
To return to standing, squeeze your gluts (imagine pinching a penny in your buns), and use your abdominals (pulling your bellybutton back to your spine). Make sure you come all the way upright (don’t stop bent over), and make sure you don’t lock your knees. If you follow these guidelines, you can’t go wrong. The trick is repetition to re-train your body to move in ways that support the structures. If you do twenty repetitions three times a day for a month, you’ll find that you won’t even need the stick, because you will automatically use good form. Before long you will find yourself incorporating this new pattern of movement into your daily life.
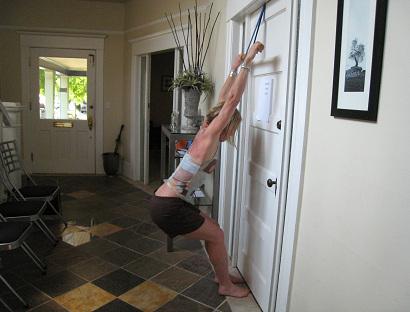
Hanging Stretch
[Strength, Stability]
Position
You can use a chin-up bar that mounts in a doorway or a 2 foot long dowel rod in your door strap, a stair rail, or even your kitchen sink. The important thing is the form.
- Stand under the bar or in front of the stair rail/ kitchen sink.
- Grasp the bar/rail/lip of the sink.
- Fold over your hips and stick your butt backward, maintaining neutral spine (don’t look at the bar).
- Let your bodyweight hang back from your hands and think of melting your chest forward toward the floor.
- Stand up before you let go.
|
What you should feel
|
Stretch in the arm, arm pit, chest, or low back.
|
|
Hold time
|
60 seconds (you may be limited by your grip).
|
|
Repetitions
|
Beginning: 5 x day Maintenance: 1 x day
|
|
Goal
|
Create a line from your hands to your hips.
|
|
What to avoid
|
Solution
|
|
Pinch in the shoulder.
|
Decrease the angle between your hands and hip.
|
“Snow Angels”
[Pectoral Stretch]
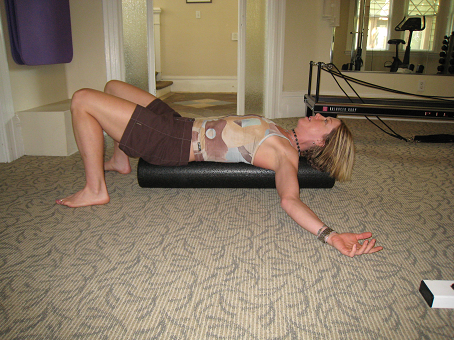
The pectoral muscles attach from the sternum (breastplate and ribs) to the scapula (shoulder blade) and humerus (arm). If they are too tight (as they are on most people) this holds the shoulders forward and maintains a thoracic kyphosis (hunch back). They are one of the most critical areas to stretch for anyone with back or neck problems, and it’s easy too! Click here to buy roller for this exercise (round 36″x6″).
Position
- Lay on your roller (6” in diameter) so that your head and the tailbone are supported.
- Knees are bent, and feet are on the floor.
- The back and neck are neutral (all eyes face the ceiling).
- The roller should contact your tailbone, mid back, and head, with a small space behind your low back and neck. You may need to support your head with a towel or small pillow.
- Drop your arms out to the side, palms up. Keep the entire back of your hands down on the floor.
- Slowly move your arms up like a snow angel. This will change where you feel the stretch.
|
What to feel
|
A strong stretch across the front of your chest.
|
|
Hold time
|
5 minutes in varying positions of your arms.
|
|
Goal
|
To touch your hands together over your head, keeping the back of your hands on the floor the entire time.
|
|
What to avoid:
|
Solution:
|
|
Cervical hyperextension.
|
Place a towel behind your head.
|
|
Lumbar hyperextension.
|
Tighten the abdominals to stabilize the lumbar spine.
|
|
A “pinch” in the shoulder.
|
Stay below the angle where you feel a pinch.
|
|
Tingling in the hands.
|
Take a rest and / or decrease the hold time.
|
Neck Stretch 1
[Muscle Flexibility]
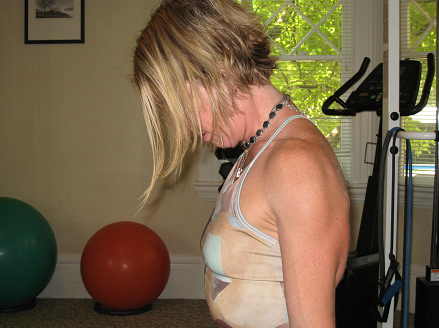
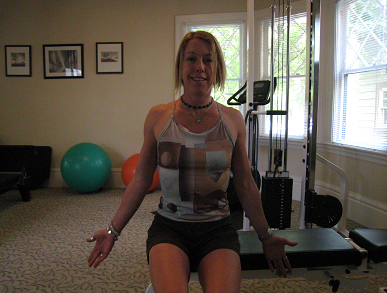
This stretch lengthens the muscles and connective tissue in the back of the cervical spine.
Position
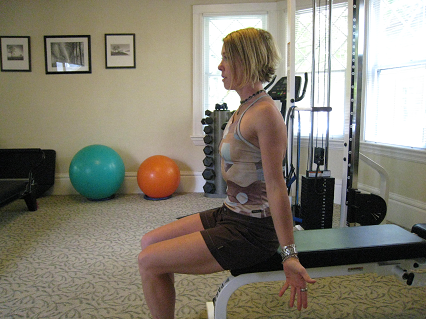
- Sit in neutral spinal alignment.
- Intentionally reach both of your arms toward the floor with your palms facing away from you.
- Visualize sliding your scapula down and back
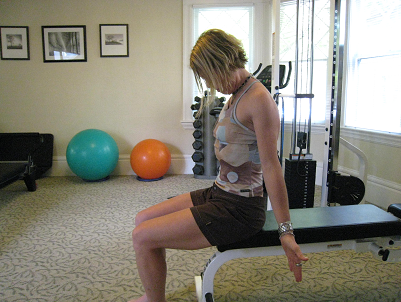
- Inhale and imagine growing taller through the top of your head.
- Exhale as you curl your head toward your chest, one vertebra at a time.
- Inhale to re-stack the vertebrae one at a time as you return to the start position.
|
What you should feel
|
A stretch in the back of your neck and thoracic spine.
|
|
Hold
|
10 slow breaths.
|
|
Repetitions
|
Beginning 2 – 3 x day Maintenance 1 x daily
|
|
Goal
|
To open the facets and stretch the cervical spine without moving the thoracic or lumbar spine.
|
|
What to avoid
|
Solution
|
|
Bending the cervical spine backward.
|
Stop at neutral as you return to the start position.
|
|
Radiating pain into the arms or legs.
|
Stop exercise immediately.
|
|
Contraindication
|
Cervical disc herniation.
|
Neck Stretch 2
[Muscle Flexibility]
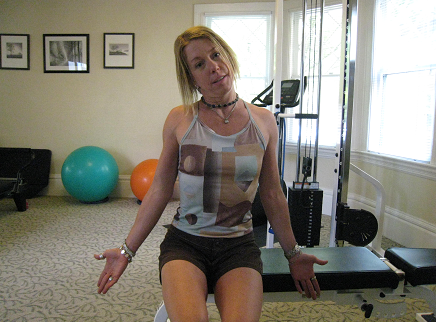
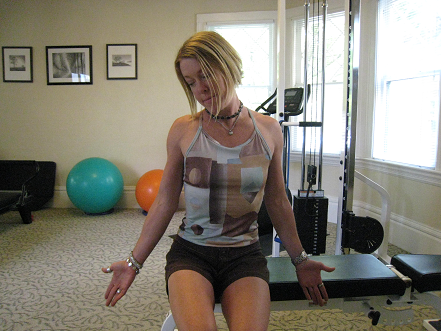
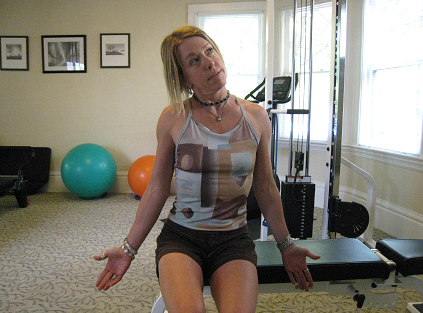
This stretch lengthens the muscles and connective tissue on the side and front of the cervical spine. It may also stretch the cervical nerve roots.
Position
- Sit in neutral spinal alignment.
- Reaching your hands to the floor and your shoulder blades to your back pockets.
- Palms face forward.
- Tip your head directly to your right shoulder.
- Maintaining the tip of your head, rotate your face down toward floor — Imagine a globe turning on its axis.
- Maintain the tip of your head and rotate your face up toward the ceiling
|
What you should feel
|
A stretch on the side of your neck that shifts backward as you look down, and forward as you look up.
|
|
Hold time
|
30 seconds in each position.
|
|
Repetitions
|
2 x each side.
|
|
Goal
|
To open the facets and stretch the cervical spine.
|
|
What to avoid
|
Solution
|
|
A “pinch” on the side you are bending toward.
|
Stop the exercise and check your form.
Discontinue if your complaints continue.
|
|
Radiating pain into your arms.
|
Stop/ check form/ discontinue.
|
|
Moving your neck forward or back as you rotate.
|
Check your form.
|
|
Contraindications
|
Cervical disc, bone spurs, stenosis.
|
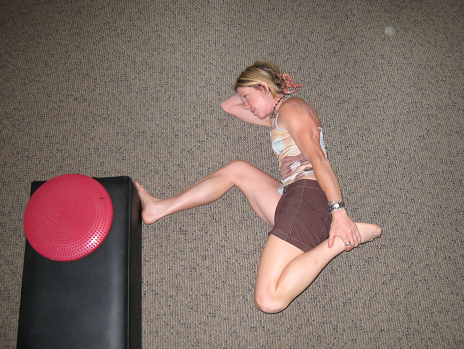
Quadricep
[Muscle Flexibility]
The quad muscles cross the hip and the knee joints. If the quads are too tight, they hold the pelvis forward in an anterior tilt position. This causes increased low back extension and compression.
Position
- On your side, with both knees as close to your chest as you can comfortably get them.
- Block your bottom foot on something like a wall or a couch.
- (This keeps your spine stable during the stretch.)
- Place your bottom hand under your head to support your neck.
- Pull the top leg back with your top hand as you squeeze your glutes.
- Visualize reaching your foot to the wall behind you.
- Keep your top leg parallel to the floor.
|
What you should feel
|
A strong stretch in the front of the thigh.
|
|
Hold time
|
60 seconds
|
|
Repetitions
|
Beginning: 2-3 x day Maintenance: 2-3x week
|
|
Goal
|
To have your top leg in line with your trunk.
|
|
What to avoid
|
Solutions
|
|
Arching your back.
|
Block your knee closer to your chest.
Exhale/Engage your abdominals.
|
|
Knee pain.
|
Decrease the angle of knee flexion:
Block behind your knee with a towel or small ball.
b. Use a rope instead of your hand.
|
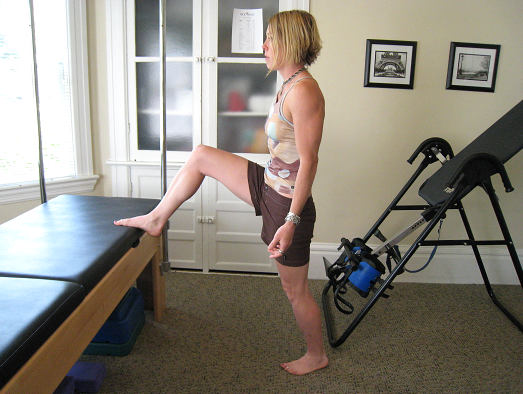
Iliopsoas
[Hip Flexor]
The hip flexors are tight on most people. Like the quads, if they are tight, they hold the pelvis forward, increasing extension and compression in the lumbar spine. Good length in the hip flexors is key to achieving a neutral pelvis and spinal alignment.
Position
- Standing with one foot on something tall, i.e. the arm or back of a couch, bed, etc.
- The foot on the floor faces forward, or slightly turned out, with knees slightly bent
- Shift your trunk forward by squeezing your gluts.
- Visualize leading from the pubic bone, not the belly button.
|
What you should feel
|
A stretch in the front of your hip.
|
|
Hold time
|
60 seconds.
|
|
Repetitions
|
Beginning: 2-3 x day Maintenance: 2-3 x week
|
|
Goal
|
Increased length in the hip flexors to allow for neutral pelvic and spinal alignment.
|
|
What to avoid
|
Solutions
|
|
Arching your back.
|
Engage abdominals and the gluts of the standing leg.
|
|
Back pain.
|
Check your form / Stop the exercise.
|
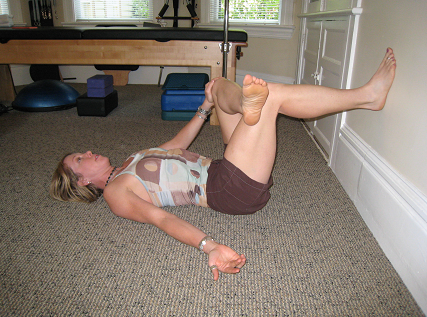
Hip Rotator Stretch
[Movement, Alignment]
The hip rotators attach from the outer hip (trochanter) to the sacrum and pelvis. Good length allows greater freedom of movement in your hip while maintaining neutral alignment of the pelvis and spine.
- On your back with one knee bent, and the foot blocked on a wall or couch.
- Cross your opposite ankle over that knee.
- Push the knee away.
|
What you should feel
|
A stretch around your hip/butt of the side you are pushing.
|
|
Hold time
|
60 seconds.
|
|
Repetitions
|
Beginning: 2-3 x day Maintenance: 2-3 x week
|
|
Goal
|
The resting hip at a 90º angle, and the leg you are stretching at arm’s length.
|
|
What to avoid
|
Solution
|
|
Losing the neutral alignment of the pelvis and spine.
|
Move further away from the wall.
|
|
Knee pain.
|
Decrease force of the hand, pushing on the knee.
|
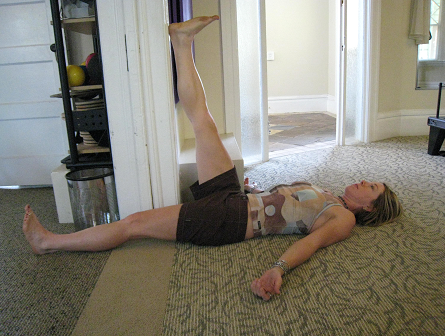
Hamstring Stretch
[Movement, Alignment]
The hamstrings attach from the base of the pelvis (your sit-bones) to behind your knee. If they are tight, they block movement of your hip and force excessive movement to your lumbar spine.
- On your back in a doorway.
- One leg on the door frame with the opposite leg on the floor passing through the door.
- The leg on the wall should be straight but not locked.
- Maintain the pelvis and spine in neutral.
- Gently flex your ankle, pointing your toes toward your nose.
|
What you should feel
|
A gentle stretch along the back of your leg that increases when you pull your toes toward you.
|
|
Hold time
|
2 – 3 second hold/release with the foot. 2 minutes total.
|
|
Repetitions
|
Beginning: 2 x day Maintenance: 3 x week
|
|
Goals
|
#1 – Hip at 90º with leg in contact with the wall.
#2 – Pelvis/spine neutral.
|
|
What to avoid
|
Solution
|
|
Rounding your back.
|
Scoot away from the wall until you can get your knee straight and pelvis neutral.
|
|
Bending your knee.
|
Tighten the quads.
|
|
Locking your knee.
|
Unlock your knee.
|
